Knowledgebase
Search Articles
Categories
Back to StackCP Hosted Email
1. Open the “Mail” app.
2. In the toolbar click “Mail” and then “Add Account”.
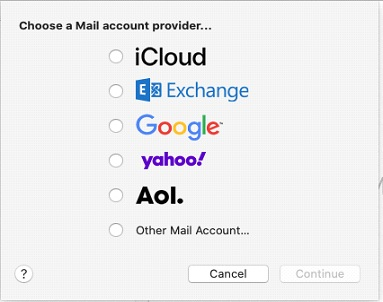
3. Click “Add Other Mail Account…” and then “Continue”.
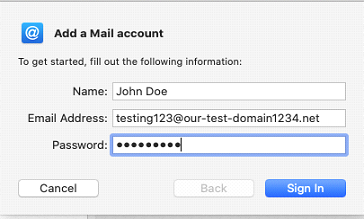
4. Enter your name, email and password in the spaces allotted. Click the “Sign In” button.
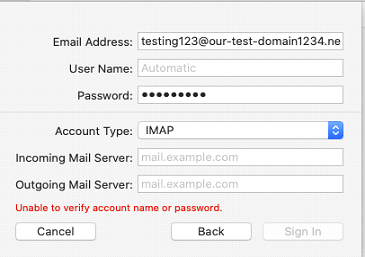
The application will try to fetch the settings automatically after you click “Sign In” button. If it fails, you may see a screen like the one below.
8. Select the “Server Settings” tab. Double-check that the information entered is correct.
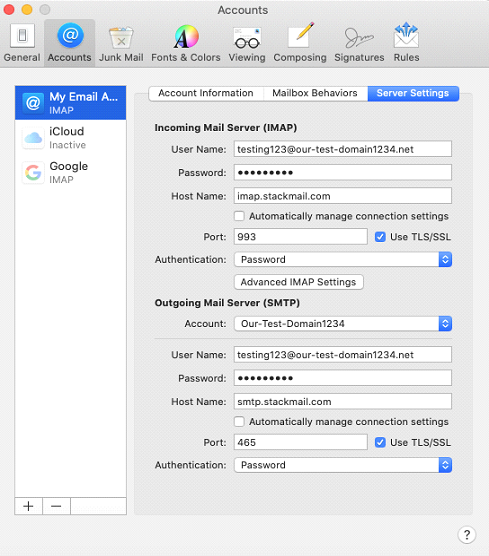
Incoming Mail Server Settings:
Turn OFF “Automatically manage connection settings”
Port: 993 with “Use TLS/SSL” enabled
Authentication: Password
Outgoing Mail Server Settings:
Turn OFF “Automatically manage connection settings”
Port: 465 with “Use TLS/SSL” enabled
Authentication: Password
After checking the information entered and making any necessary changes, close the window by pressing the red dot in the upper left corner. The application will ask you whether to save the changes before closing the window.
Click the “Save” button.

That will complete the addition of the email address into the Mac Mail program and you can then test the email address by sending and receiving emails to it.
How to change your Email Password
How to save Emails to your Personal Computer
How to set up an email account within Mozilla Thunderbird
Default Email settings for StackCP hosted emails
This section will detail how to set up the StackCP email address on Apple Mail on a Mac computer. The Stackcp email uses the Auto-discover feature and below are the steps to help guide you through the setup process.
1. Open the “Mail” app.
2. In the toolbar click “Mail” and then “Add Account”.
3. Click “Add Other Mail Account…” and then “Continue”.
4. Enter your name, email and password in the spaces allotted. Click the “Sign In” button.
The application will try to fetch the settings automatically after you click “Sign In” button. If it fails, you may see a screen like the one below.
5. If the application cannot retrieve the settings automatically, enter them manually as follows.
Enter the account’s Email Address. This will match the full email address.
Enter the account’s User Name. This will match the full email address.
Enter the account’s Email Address. This will match the full email address.
Enter the account’s User Name. This will match the full email address.
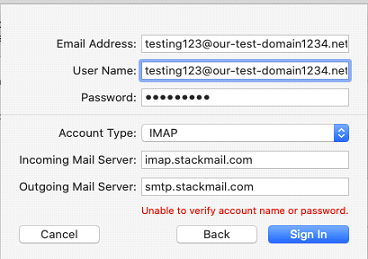
Enter the password for the email address you are configuring.
Under “Account Type” select “IMAP” or “POP”, depending on your needs.
For the Incoming Mail Server enter: imap.stackmail.com (or pop3.stackmail.com)
For the Outgoing Mail Server enter: smtp.stackmail.com
Click “Sign In”.
Under “Account Type” select “IMAP” or “POP”, depending on your needs.
For the Incoming Mail Server enter: imap.stackmail.com (or pop3.stackmail.com)
For the Outgoing Mail Server enter: smtp.stackmail.com
Click “Sign In”.
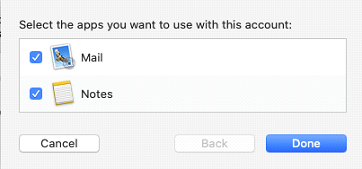
6. Select the apps to use for the email account and click “Done”.
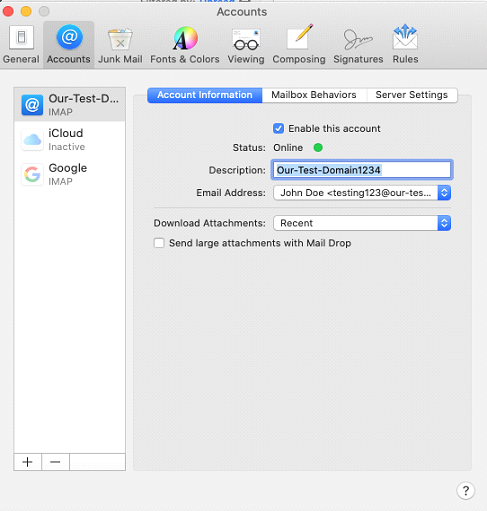
7. The email account will set up and take you to the “Account Information” page or the email inbox.
If the “Account Information” page does not load, click “Mail” from the toolbar and choose “Preferences”.
The menu on the left shows email accounts. Double-check the correct email account is selected.
You can enter a description of your choice in the “Description” box. In this example, we entered “My Email Account”.
8. Select the “Server Settings” tab. Double-check that the information entered is correct.
Incoming Mail Server Settings:
Turn OFF “Automatically manage connection settings”
Port: 993 with “Use TLS/SSL” enabled
Authentication: Password
Outgoing Mail Server Settings:
Turn OFF “Automatically manage connection settings”
Port: 465 with “Use TLS/SSL” enabled
Authentication: Password
After checking the information entered and making any necessary changes, close the window by pressing the red dot in the upper left corner. The application will ask you whether to save the changes before closing the window.
Click the “Save” button.
That will complete the addition of the email address into the Mac Mail program and you can then test the email address by sending and receiving emails to it.
Related Articles
How to log into WebmailHow to change your Email Password
How to save Emails to your Personal Computer
How to set up an email account within Mozilla Thunderbird
Default Email settings for StackCP hosted emails
Can’t Find what you need?
No worries, Our experts are here to help.